Greenland Paddle Building/Part 1: Rough Cutting
 The first step to handbuilding a Greenland paddle is to look for a straight-grained 2x4 cedar plank at your local lumberyard.
The intricacies of choice are as much art as science, but you want to find a clear, knotless piece with tight grain and no cracks or voids. (For more info on blank choice, you can always contact Brian Nystrom, who has written a fine book on making Greenland paddles. Although his approach differs from Dee Hall's, it's just as effective.)
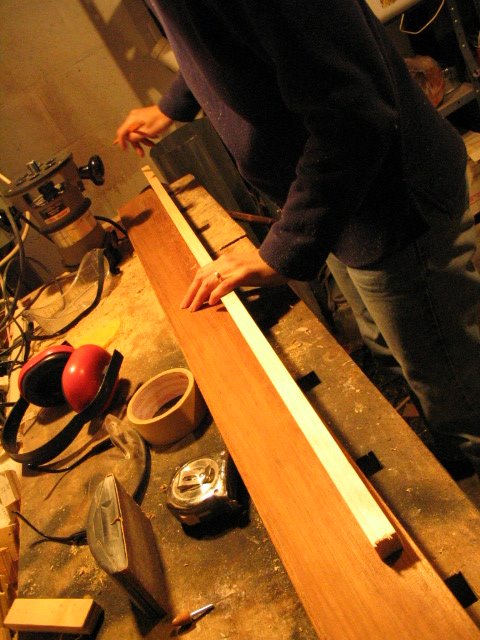
Here's Dee, a trip leader trainer for a local kayaking organization, preparing to make the first rough cuts to her blank. Using the inside edge of a straightedge, she pencils in the paddle's rough shape: wider at one end (top center of photo, by her right hand), narrower at the shoulder (bottom right of photo).
There's a couple of details to note in the photo: hearing protection (the red ear muffs), essential come time to spark up the router; the router (top left, and essential to Dee's carving technique), and finally the roll of masking tape, which Dee uses to trace the shape of the end blade.
She's also got some other handtools (try doityourself.com, an excellent site on basic tools) scattered around: a tape measure, sanding block, and lots of sandpaper. (Best to buy your sandpaper online from places like Ohio Supergrit. Much cheaper than your local Home Depot.)
This is the first step to rough-cutting a Greenland paddle. The specific details of diameter, width, and so on, are pretty flexible.
Essentially you tweak those measurements to fit the size of your palm and the "o" of an "okay" gesture you make with your thumb and forefinger, as well as how long your arms are.
To read the rest of the series:
To read the rest of the series:

Comments
thanks for the heads up. I corrected it to paddling.net
Adam